This article shows how to get and then centre-align the row of sharing items that you can get from AddThis (and it's likely that a similar technique applies to sharing buttons from other services like ShareThis, too).
 If you think that Blogger's own social sharing buttons a just a bit too small and difficult position, then you may decide to use a service like AddThis to generate buttons that are more elegant all round.
Signing up with AddThis is easy: just log in to your Blogger account, and in a separate tab open up AddThis.com. Choose Create Account, and then Continue with Google. This links your Google account and your AddThis account, and is the easiest approach - but there are other options too, like creating your account with your Facebook or Twitter accounts, or even just signing up the old fashioned way with your email address.
Once you have signed up and chosen a plan (personally I just the free "Basic" plan), you need to actually install the AddThis buttons on your site. To do this:
Installing the code that AddThis gave you is pretty much like installing any other piece of code. Typically the code you have to install has two parts:
For the piece that says:
For the piece that says:
But you may use a different approach, depending on what your blog is trying to achieve.
YMMY, of course.
Using Div statements to control layout
Signing up with AddThis is easy: just log in to your Blogger account, and in a separate tab open up AddThis.com. Choose Create Account, and then Continue with Google. This links your Google account and your AddThis account, and is the easiest approach - but there are other options too, like creating your account with your Facebook or Twitter accounts, or even just signing up the old fashioned way with your email address.
Once you have signed up and chosen a plan (personally I just the free "Basic" plan), you need to actually install the AddThis buttons on your site. To do this:
- Select one or more sets of sharing buttons (from the options available to your account type),
- Choose the settings which apply to that set of buttons
- Choose Activate (button in the bottom right corner of the setting screen), and
- Install the code that AddThis gave you into your blog.
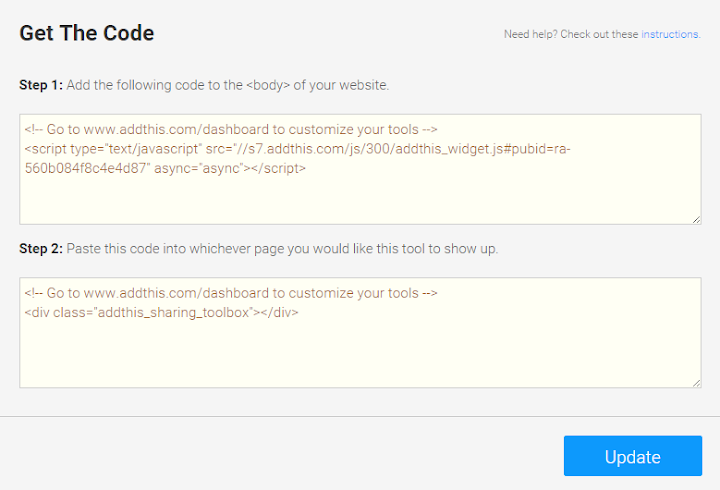
Installing the code that AddThis gave you is pretty much like installing any other piece of code. Typically the code you have to install has two parts:
For the piece that says:
Step 1: Add the following code to the <body> of your website.Search for "<body" (note: no closing angle-bracket because some templates have extra instructions in there), and then put the code from AddThis after the angle bracket that goes with the <body
For the piece that says:
Step 2: Paste this code into whichever page you would like this tool to show up.Find the location in your template that you would like the gadget (eg an HTM gadget, or inside the post statement itself - read more about the options), and copy and paste the relevant code from AddThis.
But it's not in the right place.
If you install the code as is from AddThis, you will find that the row of sharing buttons is pretty tightly linked up with the rest of the page, and left-aligned. Fortunately this is easy to change.How to centre (or right align) rows of buttons from AddThis
To put the set of sharing buttons from AddThis at the middle of the page, you need to surround the 2nd piece of code from AddThis with another Div statement, like the one in bold below:<div style = 'width:100%; text-align: center; margin-bottom:3em; margin-top:2em;'><!-- Go to www.addthis.com/dashboard to customize your tools -->The exact details to use depend on how exactly you want to set up your sharing-bar form AddThis. I wanted it to be centre-aligned on one of my sites, with some extra white space above and below, so I used these commands:
<div class="addthis_sharing_toolbox"></div>
</div>
- width:100% - says to use all of the page-width in deciding where to put the sharing bar (by detfault, it would just use the width of the sharing bar itself
- text-align: centre - means that he bar will be put in the middle
- margin-bottom and margin-top put some extra space above and below the gadget, so it sticks out more-so.
But you may use a different approach, depending on what your blog is trying to achieve.
What your readers see
Visitors using a web-browsers
Will see your AddThis buttons, as you defined them
Readers who subscribe to your blog's RSS feed
Will not see your blog's AddThis sharing buttons, unless they happen to click through from their feed-reader to your blog.
Readers who follow-by-email
Will not see your standard social sharing buttons at all, unless they visit your site. (AddThis does have some email newsletter buttons, but these don't automatically go into emails generated from Blogger).
Is it worth it?
For what it's worth, I recently made the change from custom sharing buttons that I'd made myself to classier looking ones from AddThis, and saw quite a jump (50% or more) in the number of social shares, across all my sites.YMMY, of course.
Related Articles
Installing 3rd party code into BloggerUsing Div statements to control layout
Comments
Post a Comment
Share or Leave Your Comment