This article describes how to get a link to one ore more photos from your Google Photos collection, using the Shareable Link controls. It also explains how to delete shareable links that you have made in the past
 Google Photos is a tool for managing picture collections. It replaces Google+ Photos, and works alongside Picasa-web-albums. You can read more about it here.
Shareable Links are a new type of linking introduced in Google Photos, which let you easily share one or more pictures at the same time. You can email them, or use them in tools like Facebook.
When someone opens a shareable link, they see a display with the date, the name and picture of the person who is logged in to Google at the time, and all the pictures that are included in the same shareable link.
If you want to use an image from Google Photos in a tool which cannot use shareable links, you need to find the URL for the photo, instead.
Log in to Google Photos
Navigate to the picture that you want to get the link for.
Click on the picture, so you see it in full screen mode.
Hover your mouse towards the top-right of the screen, and you will see some control show up: these are quite small, and are white (so may be harder to see against some backgrounds).
One of the controls is the Share icon: it looks like a side-ways triangle with one bar missing. Click it.

In the Share pop-up that opens, click "Get shareable link"

Wait while Photos generates a link.
When it is finished, copy the link text.
(Ctrl/c on the keyboard is the easiest way to do this, since the text is automatically selected).

Job done! The display address for the photo which you were looking at is in your computer's memory, and you can paste it (with ctrl/v or Edit > Paste) into any other place that wants it (eg Facebook, in an email message, or something that will accept an address which displays the photo inside a "wrapper" of some sort. s photo-insert wizard, or an email message or discussion forum or chat window).
You can share several (or lots) of photos with someone by just giving them one web-address, which opens up a screen with all the photos.
To do this:
Click the small selection icon (tick) at the top left hand side of each picture that you want to include.
(Once a photo is selected, the icon shows as blue, and there is a border around the picture).

Hover your mouse towards the top-right of the screen, and you will see some control show up: these are quite small, and are white (so may be harder to see against some backgrounds).

Click the Share control icon: it is the one that the arrow is pointing to in the picture just above this.

If you click it, then you are given the chance to delete any existing links to the currently selected group of photos.
This doesn't seem to make any sense at the time when you are first making the link.
But it also works later on: if you have the same photos selected and choose to get the shareable link again, you will get the same link - and you may delete it instead.
This does not delete the photos themselves, just the previous link to the currently-selected group of photos. If anyone (or anything, eg Facebook) tries to use that link again, they will get an error message instead.
Another way to delete links is from the left-side menu in Photos: Choosing More > Shared links shows you al list of all shareable links you have ever made, and then for each one you can either copy the link or delete it.

How to put a picture into a post in Blogger

Shareable Links are a new type of linking introduced in Google Photos, which let you easily share one or more pictures at the same time. You can email them, or use them in tools like Facebook.
When someone opens a shareable link, they see a display with the date, the name and picture of the person who is logged in to Google at the time, and all the pictures that are included in the same shareable link.
If you want to use an image from Google Photos in a tool which cannot use shareable links, you need to find the URL for the photo, instead.
How to get the shareable link for one photo in Google Photos
Log in to Google Photos
Navigate to the picture that you want to get the link for.
Click on the picture, so you see it in full screen mode.
Hover your mouse towards the top-right of the screen, and you will see some control show up: these are quite small, and are white (so may be harder to see against some backgrounds).
One of the controls is the Share icon: it looks like a side-ways triangle with one bar missing. Click it.

In the Share pop-up that opens, click "Get shareable link"
Wait while Photos generates a link.
When it is finished, copy the link text.
(Ctrl/c on the keyboard is the easiest way to do this, since the text is automatically selected).
Job done! The display address for the photo which you were looking at is in your computer's memory, and you can paste it (with ctrl/v or Edit > Paste) into any other place that wants it (eg Facebook, in an email message, or something that will accept an address which displays the photo inside a "wrapper" of some sort. s photo-insert wizard, or an email message or discussion forum or chat window).
How to get the shareable link for more than one picture
You can share several (or lots) of photos with someone by just giving them one web-address, which opens up a screen with all the photos.
To do this:
Click the small selection icon (tick) at the top left hand side of each picture that you want to include.
(Once a photo is selected, the icon shows as blue, and there is a border around the picture).

Hover your mouse towards the top-right of the screen, and you will see some control show up: these are quite small, and are white (so may be harder to see against some backgrounds).
Click the Share control icon: it is the one that the arrow is pointing to in the picture just above this.
Continue in the same way as for getting a shareable link to an individual photo (ie the section above)
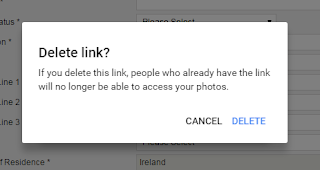
What does the Delete link do
You may have noticed that there is a delete function on the Shareable link screen.
If you click it, then you are given the chance to delete any existing links to the currently selected group of photos.
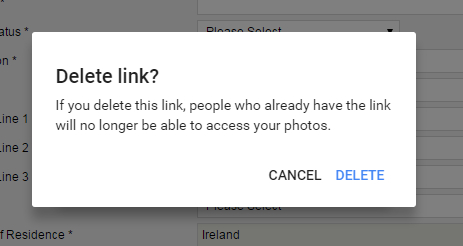
This doesn't seem to make any sense at the time when you are first making the link.
But it also works later on: if you have the same photos selected and choose to get the shareable link again, you will get the same link - and you may delete it instead.
This does not delete the photos themselves, just the previous link to the currently-selected group of photos. If anyone (or anything, eg Facebook) tries to use that link again, they will get an error message instead.
Another way to delete links is from the left-side menu in Photos: Choosing More > Shared links shows you al list of all shareable links you have ever made, and then for each one you can either copy the link or delete it.

Where to find more information
Introduction to Google PhotosHow to put a picture into a post in Blogger
Comments
Post a Comment
Share or Leave Your Comment