This article explains how to put a picture that is one shape (a "square peg") inside an image of another shape (a "round hole" - or star, elipse, octagon, etc) - using Microsoft PowerPoint.
Original title: How to put a square peg into a round hole - in pictures
 This image was made by Loadmaster (David R. Tribble) Email the author: David R. Tribble Also see my personal gallery at Google Picasa (Own work) [CC-BY-SA-3.0 (http://creativecommons.org/licenses/by-sa/3.0) or GFDL (http://www.gnu.org/copyleft/fdl.html)], via Wikimedia Commons") Recently, I've been using PowerPoint to make the thumbnail image for my posts. This means that I own the copyright of the pictures, so can share them without worrying about copyright issues.
Recently, I've been using PowerPoint to make the thumbnail image for my posts. This means that I own the copyright of the pictures, so can share them without worrying about copyright issues.
One approach I've used is to find an interesting copyright-free picture that is related to the theme of the post, and then put it inside a shape that adds some visual interest or has some words along side it. Another thing that I'm going to try is using multiple pictures in this way to make a more-interesting-than-usual collage.
 1 Get your image file, and save it somewhere on your computer.
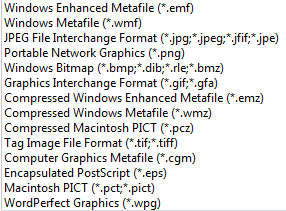
A wide range of picture-file formats are supported by PowerPoint: in the 2007 version this includes as shown in this list:
2 In PowerPoint, make a blank side (Home > Layout > Blank)
3 Then add a shape (Insert > Shapes, click on the shape you want)

Intially, the shape with have the fill-colour and border that are the current default values. But you can change this, which is what we are going to do.
4 Right-click on the shape, and choose Format Shape from the pop-up menu

5 In the Fill tab, choose Picture or Texture Fill, then click the File button and navigate to the image file you got in step 1, and click OK.

 6 Make sure that the portion of the picture that you want to show is in the picture: to start with the shape is centered on the middle of the picture.
Change this using the Offsets to move the shape to the left or right over the image. You can make the offsets positive or negative as shown.
You can monitor the results of different settings in PowerPoints slide thumbnails (on the left hand side, if you have it showing), or by dragging the pop-up menu to a different place in the screen so that you can see the shape itself.
Job Done - at this point, you have an image that is cropped to the shape that you chose - now you just have to put it into your blog.
There are (at least) three ways to get the shape-cropped-picture from PowerPoint into your blog.
I usually copy the item from PowerPoint, and then paste it into a picture editor (Paintbrush etc), manually. This is an old-fashioned approacb - but it lets me adjust the size and position of the image, and save it (usually a .png) with a file-name that describes the image really well which is good for mating the blog come up in search results (SEO). The this picture can be inserted into a post just like any other picture.
Another option is to choose File > Save As from Powerpoint, and choose to save the slides in an image format, eg JPEG which can also be inserted into a post in the usual way. You are likely to be asked whether to put all the slides in one image, or to make one image per slide. Usually, it would be best to make one image per slide - but I don't use this method because the image that is created is the size of the whole slide, rather than just the pictures on it.
A third option is to display the PowerPoint file as a slideshow. This isn't something that I'd do for only one shaped image, but may be relevant in some situations.
 One thing that you don't have any control of inside PowerPoint is the zoom level of the inserted picture.
If you make the shape larger, it doesn't show a larger proportion of the picture. Instead, it just shows the existing picture in a larger size, as you can see in the slides shown here.
I suspect that if you want to zoom in to a particular area of the image file, the only approach is to edit the picture in another tool, crop out the bit that you do not want to show, and only keep the part that you want to include inside your shape.
However PowerPoint does have some limited control over the contrast and brightness of the picture, from the Picture tab of the Format Shape window.
Yes, you can.
Photoshop, and similar commercial tools almost certainly have features like this, and I'm certain that GIMP (like a public-domain, less powerful version of Photoshop) and Inkscape (another public-domain image program which is more focussed on scalable-vector-graphics and objects than on pixels) also have these features.
So why use PowerPoint? In short, its (relatively) cheap and many people have access to it already. It's also very easy to learn, compared to the other packages, and what you learn is likely to apply to lots of tasks and not just in making pictures for your blog.
Putting a picture into a blog-post
Post.thumbnail and post.summary - ways of describing blog posts
Showing a PowerPoint slideshow in Blogger
Copyright, blogs and Blogger/Google
Original title: How to put a square peg into a round hole - in pictures
 This image was made by Loadmaster (David R. Tribble) Email the author: David R. Tribble Also see my personal gallery at Google Picasa (Own work) [CC-BY-SA-3.0 (http://creativecommons.org/licenses/by-sa/3.0) or GFDL (http://www.gnu.org/copyleft/fdl.html)], via Wikimedia Commons")
One approach I've used is to find an interesting copyright-free picture that is related to the theme of the post, and then put it inside a shape that adds some visual interest or has some words along side it. Another thing that I'm going to try is using multiple pictures in this way to make a more-interesting-than-usual collage.
How to put a picture inside a shape
NB PowerPoint commands are based on Office 2007 and 2010 - but the same principles most-likely apply in other versions where the commands may be slightly different.A wide range of picture-file formats are supported by PowerPoint: in the 2007 version this includes as shown in this list:
2 In PowerPoint, make a blank side (Home > Layout > Blank)
3 Then add a shape (Insert > Shapes, click on the shape you want)

Intially, the shape with have the fill-colour and border that are the current default values. But you can change this, which is what we are going to do.
4 Right-click on the shape, and choose Format Shape from the pop-up menu
5 In the Fill tab, choose Picture or Texture Fill, then click the File button and navigate to the image file you got in step 1, and click OK.

Change this using the Offsets to move the shape to the left or right over the image. You can make the offsets positive or negative as shown.
You can monitor the results of different settings in PowerPoints slide thumbnails (on the left hand side, if you have it showing), or by dragging the pop-up menu to a different place in the screen so that you can see the shape itself.
Job Done - at this point, you have an image that is cropped to the shape that you chose - now you just have to put it into your blog.
Using the picture
There are (at least) three ways to get the shape-cropped-picture from PowerPoint into your blog.
I usually copy the item from PowerPoint, and then paste it into a picture editor (Paintbrush etc), manually. This is an old-fashioned approacb - but it lets me adjust the size and position of the image, and save it (usually a .png) with a file-name that describes the image really well which is good for mating the blog come up in search results (SEO). The this picture can be inserted into a post just like any other picture.
Another option is to choose File > Save As from Powerpoint, and choose to save the slides in an image format, eg JPEG which can also be inserted into a post in the usual way. You are likely to be asked whether to put all the slides in one image, or to make one image per slide. Usually, it would be best to make one image per slide - but I don't use this method because the image that is created is the size of the whole slide, rather than just the pictures on it.
A third option is to display the PowerPoint file as a slideshow. This isn't something that I'd do for only one shaped image, but may be relevant in some situations.
Adjusting the size and quality of the picture

If you make the shape larger, it doesn't show a larger proportion of the picture. Instead, it just shows the existing picture in a larger size, as you can see in the slides shown here.
I suspect that if you want to zoom in to a particular area of the image file, the only approach is to edit the picture in another tool, crop out the bit that you do not want to show, and only keep the part that you want to include inside your shape.
However PowerPoint does have some limited control over the contrast and brightness of the picture, from the Picture tab of the Format Shape window.
Can you do this in other tools? Why PowerPoint?
Yes, you can.
Photoshop, and similar commercial tools almost certainly have features like this, and I'm certain that GIMP (like a public-domain, less powerful version of Photoshop) and Inkscape (another public-domain image program which is more focussed on scalable-vector-graphics and objects than on pixels) also have these features.
So why use PowerPoint? In short, its (relatively) cheap and many people have access to it already. It's also very easy to learn, compared to the other packages, and what you learn is likely to apply to lots of tasks and not just in making pictures for your blog.
Related Articles:
Putting a picture into a blog-post
Post.thumbnail and post.summary - ways of describing blog posts
Showing a PowerPoint slideshow in Blogger
Copyright, blogs and Blogger/Google
Comments
Post a Comment
Share or Leave Your Comment